My Personal Address Book - Getting Started
![]()
My Personal Address Book is an easy to use address management system. It simplifies keeping track of your addresses, and yet provides many powerful features that allow you to perform functions such as printing various size address books (sized for systems such as Day Timer), printing envelopes addressed to the people in your address book, printing labels addressed to the people in your address book, and sending e-mails to the people in your address book. In addition, with My Personal Address Book you can get a map and driving directions to the addresses in your address book, and you can display a reminder list of upcoming birthdays and anniversaries.
Download and install the application
Run the application
The main screen is displayed
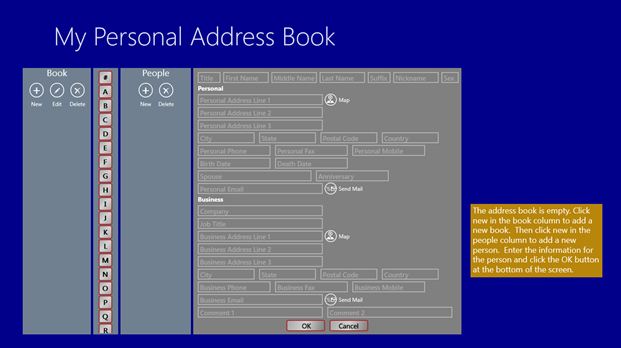
The first time you run the application, the address book data base is empty.
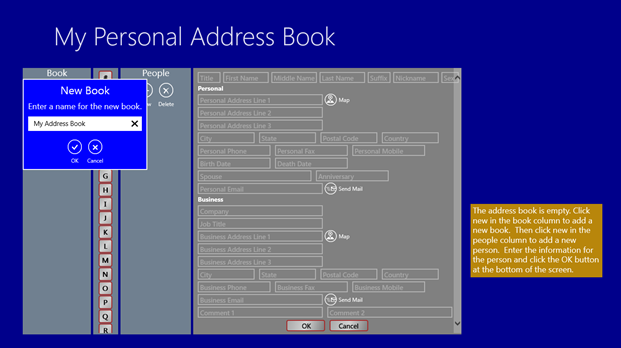
To create a book click New in the book column and give the book a name.
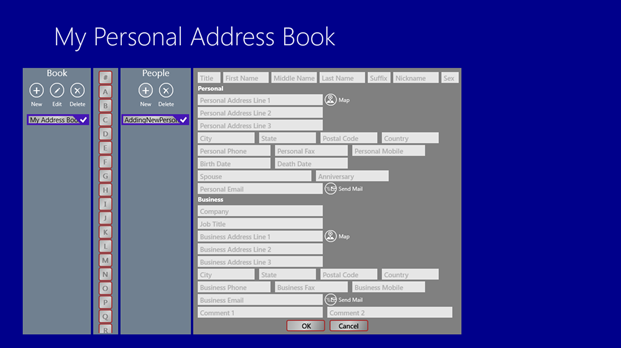
Next click New in the people column. A new person record is created.

Enter the information for this person and click the OK button at the bottom of the screen.
Owner Record
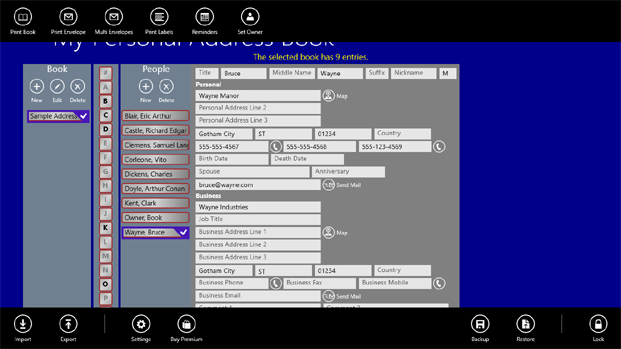
You should enter an address record for yourself, and identify it to the program as the owner's record. The program uses the owner's record on the printed books to show who owns the book, to build the return address when you print envelopes, and as the starting address when you generate a driving directions request. To set the owner's record, select the record with your address, and click the Set Owner button in the App Menu Bar.
Update A Record
To update a person's information select the person in the people column. If the person is in a different book, select the correct book in the book column. Enter the new information and click the OK button at the bottom of the screen. If you change your mind and do not want to save the changes you can click the Cancel button, and the changes will be discarded.
NOTE: If multiple records are selected, then you cannot update a record. Change the selection to a single record -- the record you wish to update.
Copy A Record To Another Address Book
You can copy a record from one address book to another by clicking the record in the source address book and dragging it onto the target address book.
To copy multiple records at one time, select all of the records you wish to copy, and then click and drag them onto the targer address book.
NOTE: If you click and drag a record that is not selected, then that record will be copied -- not the ones that are selected.
Click the Send Mail To button beside the e-mail address you wish to use (personal or business), and the program will launch your e-mail program with the person's corresponding e-mail address already filled in.
If you wish to send an e-mail to several people at the same time, select all the people you wish to send the e-mail to, and then click the Send Mail To button.
If you send e-mails to the same group of people on a regular basis, you can create a record with a name like Mailing List, and enter multiple e-mail addresses in this record. Just separate the e-mail addresses with a comma. Then you can select this one record and send an email to all of the e-mail addresses you have entered.
Driving Directions
Click the Map button beside the address you wish to use (personal or business), and the program will launch a Windows Map application with the driving directions request.
Print An Address Book
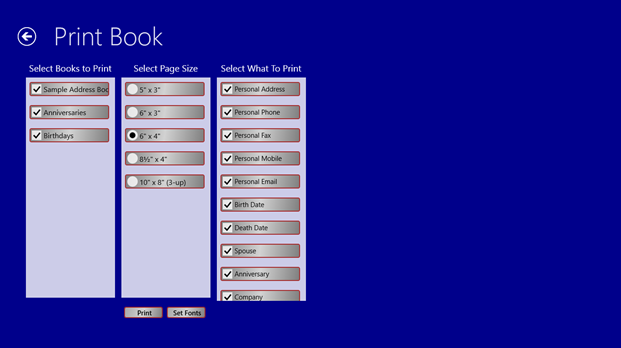
To print your address book click the Print Book button in the App Menu Bar. A window will appear where you can select which book(s) you wish to print, the size of the book you wish to print, and what information you want to include in the printed book.
Select books to print
You can tell the program which book(s) you wish to print. You can also tell the program if you want to print an Anniversary List and A Birthday List for the people in you address book. Simply click the books to select or deselect them.
Select page size
You can tell the program what size printed book you want. There are five pre-defined sizes to choose from. Click the size you want to print.
>Select what to print
You can tell the program what content you want included in your printed book. This is a list of all of the data fields in the file. Click the items to select or deselect them.
To change the default fonts for the printed address book, click the Set Fonts button.
Once you have selected what to include in your book, you can print it by clicking the Print button. Instructions for assembling the book are printed on the output pages.
Print An Envelope
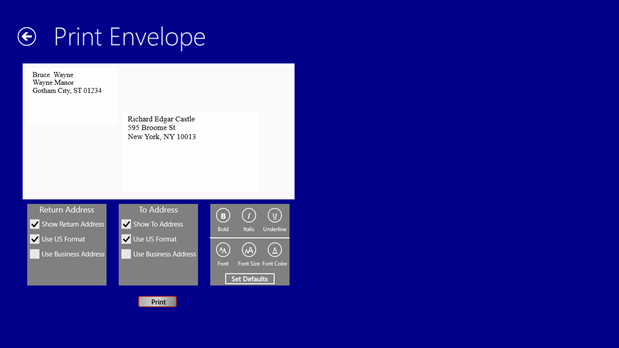
To print an Envelope, click on the person's name in the tree, then click the Print Envelope button in the App Menu Bar. A window will appear where you can select the size of the envelope you wish to use. You can make changes to the data or type in a different address before printing the envelope. You can change the font, font size, font color, etc. by selecting the text you wish to change and clicking one of the font format buttons. In addition, you can change the default font information by clicking the Set Defaults button.
Once you are satisfied with the content, you can print it by clicking the Print button or by using the Charms bar.
Print Multiple Envelopes
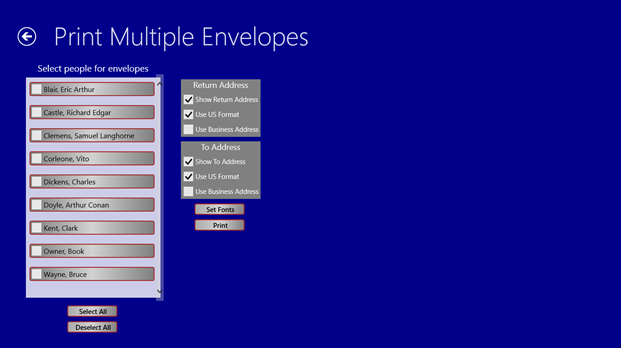
To print multiple envelopes at one time, click the Multiple Envelopes button in the App Menu Bar. A window will appear where you can select the specific people you want to have an envelope printed for. You can change the default font information by clicking the Set Fonts button.
Once you are satisfied, you can print the envelopes by clicking the Print button or by using the Charms bar.
Print Labels
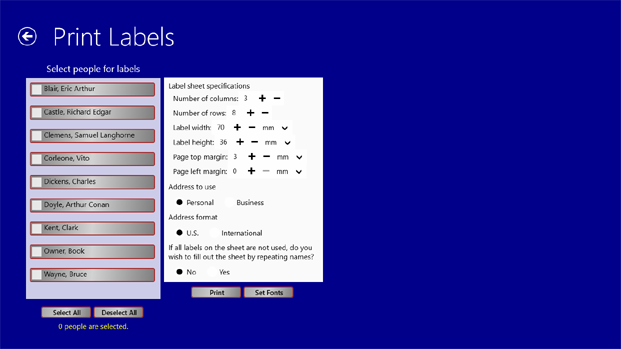
As of release 15, My Personal Address Book can print labels. To print labels, click the Print Labels button in the App Menu Bar. A window will appear where you can select the specific people you want to create a label for. You can change the default font information by clicking the Set Fonts button.
Since there are hundreds of different labels available, you need to tell the application about your label sheet. Yu can enter this information in the specifications panel located to the right of the selection box. The application will remember what you have entered for the next time. Specifically, the application needs to know, how many columns your sheet has, how many rows your sheet has, the size of the label (width and height), and the size of the margins surrounding the labels. The application also needs to know if it should use the contacts' personal or business addresses, if it should use US address or internation address formats. In addition, you can instruct the application to use all of the labels on the sheet if you have not selected enough contacts to fill the sheet. The application will repeat the selected names until all the labels on the sheet are used. This option will let you print an entire sheet for just one contact. For example, you can print a sheet of return address labels using just your own (owner's) contact record.
Once you are satisfied, you can create the labels by clicking the Print button or by using the Charms bar.
Backup Address Book
To back up your address book, click the Backup button in the App Menu Bar. You will be prompted for a location for the backup file. We recommend that you back up your data routinely.
Restore Address Book
To restore you address book from a backup file, click the Restore button in the App Menu Bar. You will be prompted for the location of the backup file.
Import Data Into The Address Book
You can import data either from a comma separated value file (csv) or from an xml file. To import click the Import button in the App Menu Bar. A pop-up will ask which type of file you are importing. Select the correct file type and click the OK button. You will be prompted for the location of the import file.
Import Data Fields
|
Field Name |
|
Description |
|
Book: |
|
The name of the book this record should go in. If the name is not provided the record will be added to a book called 'Default'. You can move the record later to another section if you wish. |
|
Title: |
|
This person's title. For example, Mr., Mrs., Dr., Rev., The Honorable, etc. |
|
FirstName: |
|
The person's first name. |
|
MiddleName: |
|
The person's middle name. |
|
LastName: |
|
This person's last name. |
|
FullName: |
|
The person's full name in the format LastName, FirstName MiddleName, Suffix. You do not need to provide this in the import file; the program will create it for you. |
|
FirstLetter: |
|
The first letter or the person's last name. You do not need to provide this in the import file; the program will create it for you. |
|
Suffix: |
|
Any suffix associate with the person. For example, Jr., PhD., etc. |
|
NickName: |
|
Any nickname the person may go by. For example, Jim, Billy, Bob, etc. |
|
Sex: |
|
The person's sex. For example M for male or F for female. |
|
PerAddr1: |
|
The first address line of the person's personal or home address. |
|
PerAddr2: |
|
The second address line of the person's personal or home address. |
|
PerAddr3: |
|
The third address line of the person's personal or home address. |
|
PerCity: |
|
The city part of the person's personal or home address. |
|
PerState: |
|
The state part of the person's personal or home address. |
|
PerCountry: |
|
The country part of the person's personal or home address. |
|
PerPostCode: |
|
The postal code, or Zip-code, part of the person's personal or home address. |
|
PerPhone: |
|
The person's personal, or home, telephone number. |
|
PerFax: |
|
The person's personal, or home, fax number. |
|
PerMobile: |
|
The person's personal, or home, cell-phone number. |
|
Spouse: |
|
The name of the person's spouse. |
|
Anniversary: |
|
The person's anniversary date. |
|
BirthDate: |
|
The person's birthdate. |
|
DeathDate: |
|
The person's death date if deceased. |
|
PerEmail: |
|
The person's personal, or home, email address. |
|
Company: |
|
The Company the person works for. |
|
JobTitle: |
|
The person's job title. |
|
BusAddr1: |
|
The first address line of the person's business, or work, address. |
|
BusAddr2: |
|
The second address line of the person's business, or work, address. |
|
BusAddr3: |
|
The third address line of the person's business, or work, address. |
|
BusCity: |
|
The city part of the person's business, or work, address. |
|
BusState: |
|
The state part of the person's business, or work, address. |
|
BusCountry: |
|
The country part of the person's business, or work, address. |
|
BusPostCode: |
|
The postal code, or Zip-code, part of the person's business, or work, address. |
|
BusPhone: |
|
The person's business, or work, telephone number. |
|
BusFax: |
|
The person's business, or work, fax number. |
|
BusMobile: |
|
The person's business, or work, cell-phone number. |
|
BusEmail: |
|
The person's business, or work, email address. |
|
Comment1: |
|
A freeform comment area for any information you wish to record about the person. |
|
Comment2: |
|
A freeform comment area for any information you wish to record about the person. |
It is not necessary to supply all of the above data in the import file. The program will leave the corresponding field in the record blank if the data is not found in the import file. In addition, if the program finds any other data in the import file, the data will be ignored. The data field header names are case sensitive; please enter them as shown above. All columns of data must have a header field with a unique header name, even if the data is not to be imported into My Personal Address Book.
Export Data From The Address Book
You can export data either to a comma separated value file (csv) or to an xml file. To export click the Export button in the App Menu Bar. A pop-up will ask which type of file you wish to export. Select the desired file type and click the OK button. You will be prompted for the location of the export file.
Sample Import/Export Files
Here are two sample import/export files that you can download; one in csv format and one in xml format.
Reminders
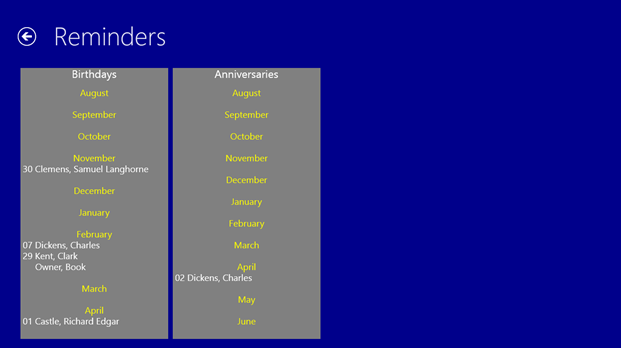
You can review a reminders page for birthdays and anniversaries by clicking the Reminders button in the App Menu Bar. A list of upcoming birthdays and anniversaries will be displayed for each person that has either birthdate or anniversary date information in their record. The dates can be in either US format (mm/dd/yyyy) or in European format (dd.mm.yyyy). Any information entered in these fields that does not match one of these two formats will be ignored.
Up to the next five of these reminder dates will be shown in the application's live tiles on the start screen, if the dates occur within the next two months, and if you have live tiles enabled for the application.
Password Protecting Your Address Book
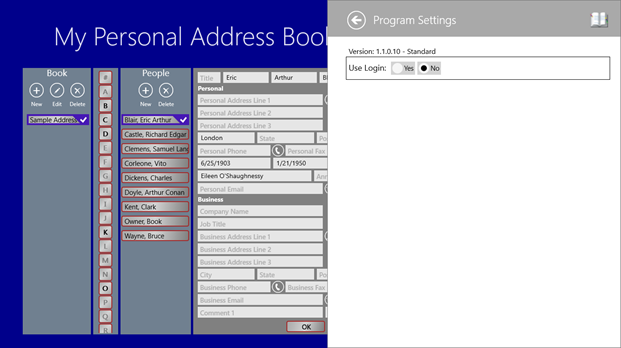 You can password protect your address book and require logging in by turning on the Use Login option on
the program settings screen. To access the program settings screen, select settings in either the App Menu Bar,
or using the Charms bar, and then select Program Settings. The program settings screen will fly out from the
right side of your screen.
You can password protect your address book and require logging in by turning on the Use Login option on
the program settings screen. To access the program settings screen, select settings in either the App Menu Bar,
or using the Charms bar, and then select Program Settings. The program settings screen will fly out from the
right side of your screen.Click Yes next to Use Login. You will be prompted to enter your password.
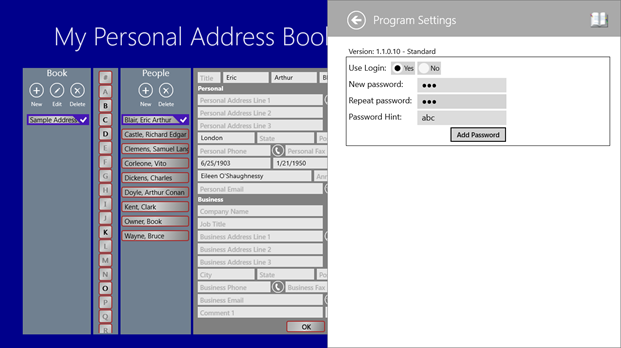
Enter your password in the New password field, and repeat it in the Repeat password field. You can also enter a password hint that you can use as a reminder should you forget your password. Then click the Add Password button. A login screen will appear when you start the application. In addition, a Lock button will show in the App Menu Bar so you can lock the application whenever you wish.
To change your password, return to the program settings screen and enter the new information. You will have to enter your current password as well. To turn of the Use login option, return to the program settings screen and click No next to Use Login. Your password will be removed and the login screen will no longer appear when you start the application.
Premium Subscription:
The premium license is an annual subscription, which provides additional features:
- You can use OneDrive to store your address book, and to share it among multiple devices.
- You can encrypt your address book data.
- Eliminates advertising
To purchase the premium subscription, click the Buy Premium button on the App Menu Bar. You will be shown a screen from the Windows Store that allows you to complete the purchase.
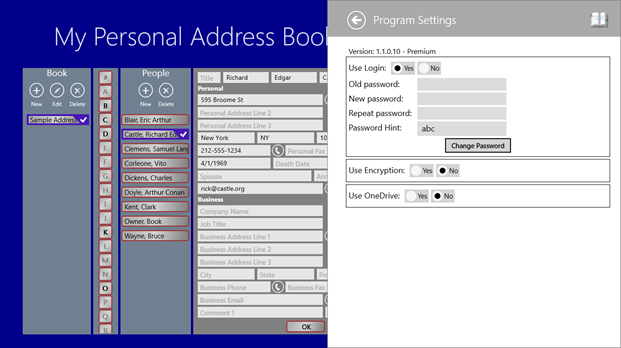
Use Encryption:
Selecting yes for the Use Encryption option will cause the program to encrypt all of your address book data when it is saving the file to your hard drive or to OneDrive. It will also encrypt the data in any backup files you make. Any data exported to either a csv or an xml file will not be encrypted.
Use OneDrive:
Selecting yes for the Use OneDrive option will cause the application use OneDrive to save the address book data base. Thereby, sharing it with other devices that you may use. For example, you have a desktop that you use at home, and you have a tablet that you take with you. If you have the Use OneDrive option enabled, the application will look for the address book data base on OneDrive, and it will update the address book data base on OneDrive if you make changes to the data base. So no matter which device you are using you will see the same data. A local copy of the data is also maintained in case you use the application in a location where you do not have internet connectivity. A couple of words of caution here. Using OneDrive can impact performance. The application must wait for the data to be downloaded from the OneDrive cloud before it can use it. In addition, if you are using the application on multiple devices simultaneously, it is possible that you could have a data collision as the data from the multiple devices is uploaded, and theoretically loose the updates from one of the devices. So it is best not to use the same application on multiple devices simultaneously. Use either one device or another at any given time.