My Education Organizer - Getting Started
![]()
My Education Organizer is an easy to use education planning system. You can maintain a course catalog, list of instructors, and your class schedule by semester. In addition, you can track class assignments, tests, and study sessions. The home page shows you events that are in progress, coming up later today, and that are planned within the next week. The calendar function allows you to view and print your schedule in 1 day, 5 day, 7 day, or monthly format. The all grades function allows you to review the results of all tests you have entered for each semester you have defined in the data base.
Download and install the application
Run the application
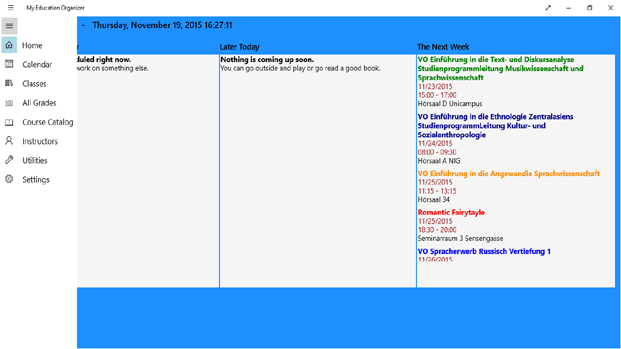
Home Page
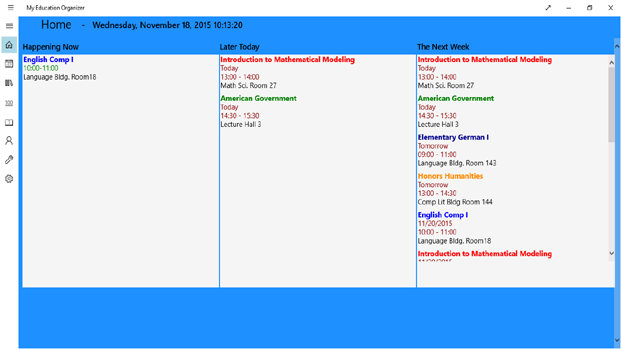
When you start the application, the Home page is displayed. The Home page gives you an overview of upcoming events.
It is divided into three columns. The first column shows events that are happening right now. The second column shows events that are coming up later today, and the third column shows what is on your schedule for the next week.
Navigation
You navigate within the application using the menu bar on the left side of the screen.
The 'hamburger' button opens and closes an expanded view of the menu. Just click on the function you would like to use, and the application will take you there.
Course Catalog
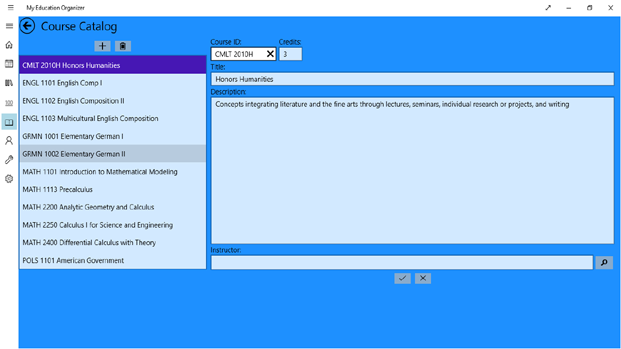
One of the first steps you should take is to define courses in your course catalog. Click on Course Catalog on the menu bar and the Course Catalog page will be displayed. The course catalog spans semesters and can be used for planning the courses you would like to take sometime during your education experience. You can enter all courses that interest you and then select them for classes as you define the classes you will take in any given semester.
To add a new course, click the new course button (+) above the list of courses. Then enter the information about the course.
Course ID: The Course ID is required. Generally, you should use the id found in your school's course catalog.
Credits: Credits is the number of credit hours you receive for completing this course.
Description: Describes the content of this course. Generally, you will use the description found in your school's course catalog.
Instructor: Instructor is the instructor that teaches this course. You enter the instructors on the Instructors page, and select the on that teaches this course here.
Once you have entered all of the information, click the okay button at the bottom of the screen. If you wish to discard your changes, click the cancel button.
If you wish to delete a course, select the course you wish to delete and click the delete button above the list of courses. Courses with active class records cannot be deleted.
Classes
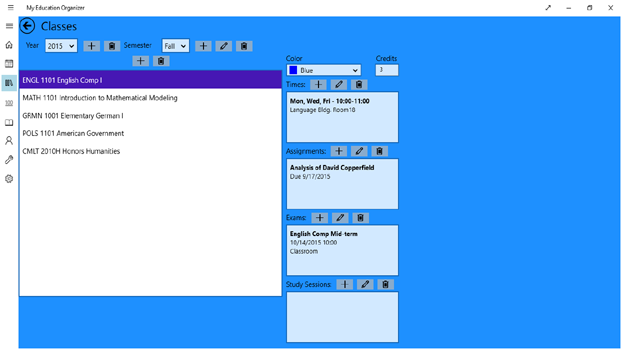
Once you have entered your courses in the Course Catalog you are ready to start defining your classes.
Classes are grouped under years and semesters. To add a year click the Add a New Year button (+) next to the year box at the top of the page and enter the year. To add a semester click the Add a New Semester button next to the semester box and enter a name for the semester. The application remembers the last year and semester selected and uses this information throughout the program.
To add a class to this semester, click the add a new class button above the class list and choose the course from the course list that pops up.
The class color is automatically assigned. The class color is used to highlight the class on the Home page and on the calendar pages. You can change the color if you desire.
The value in the credits box is automatically filled in using the credits value you entered in the course catalog. To change this value go to your course catalog and update the value there.
Times: The application needs to know when your classes are scheduled. To enter a time click the add new time button (+) to the right of the Times header and fill in the popup box. You can have more than one time record. If, for example, your class meets at 10:00 o'clock on Monday, Wednesday, and Friday, and has a lab at 11:00 o'clock on Thursday, you would need two time records. The first record would indicate classes are on Monday, Wednesday, and Friday starting at 10:00 o'clock, and the second time record would indicate classes are on Thursday starting at 11:00 o'clock.
Assignments: The application allows you to keep track of your class assignments. To enter an assignment click the add new assignment button (+) to the right of the Assignments header and fill in the popup box.
Exams: The application allows you to keep track of your tests and exams. To enter an exam click the add new exam button (+) to the right of the Exams header and fill in the popup box.
Study Sessions: The application allows you to keep track of study sessions. To enter a study session click the add new study session button (+) to the right of the Study Sessions header and fill in the popup box.
Calendar
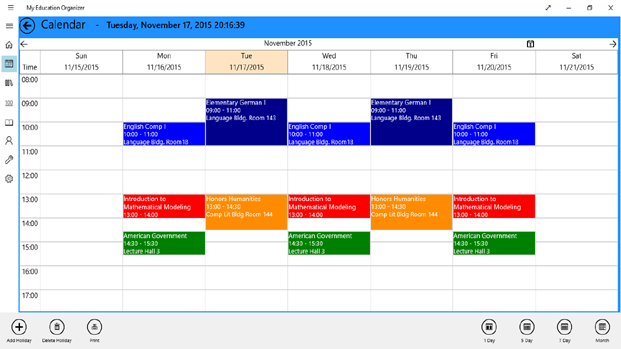
The application will display your events (classes, assignments, exams, study sessions) in a calendar format.
You can choose for 1 day, 5 day, 7 day, and monthly formats. To switch to a different format right click with your mouse (or swipe up if you are using a touch screen device). This will open a menu bar at the bottom of the screen where you can select which calendar view you wish to see. You can choose a default view on the settings page.
Holidays: You can define holidays to keep track of days when you will not have any classes. Click the Add Holiday button in the menu bar at the bottom of the screen and fill in the holiday information in the popup window.
Print: You can print your calendar to take with you or to share with someone else. Click the Print button in the menu bar at the bottom of the screen.
All Grades
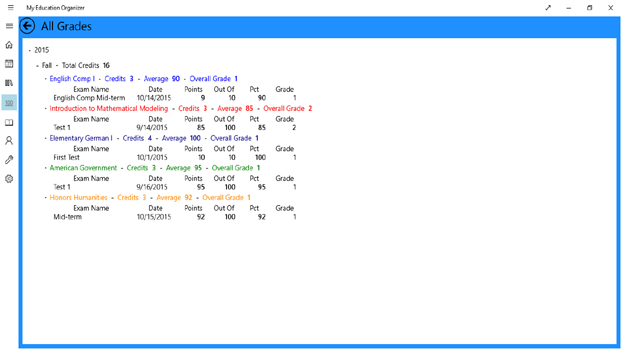
The All Grades feature allow you to review the result of all tests and exams you have entered for your classes.
Edit Exam: To edit an Exam, click on the exam you wish to edit. The open the menu bar at the bottom of the page by right clicking your mouse (swipe up from the bottom of the screen if you are using a touch screen device). Click the Edit Exam button in the menu bar at the bottom of the screen and a window will popup where you can edit the exam information.
Print: to print the All Grades report click the Print button in the menu bar at the bottom of the screen.
Utilities
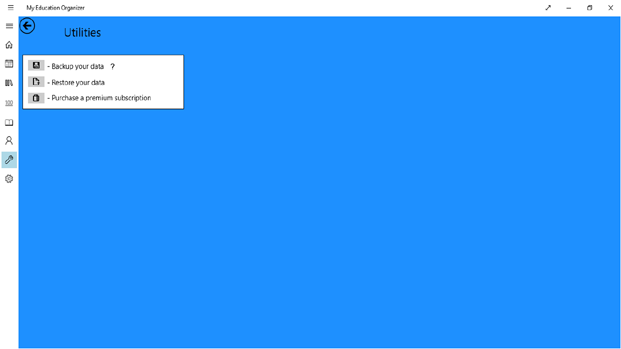
The Utilities page allows you to perform several functions in the application.
Backup your data: Make a safety copy of your data. A copy of your data will be placed in the location of your choice. Should something happen to your data base, you can restore it from this backup copy. In addition, if you have a premium license, you can enable automatic backups on the settings page.
Restore your data: Restore your data from a backup copy.
Purchase a premium subscription: Allows you to purchase a premium subscription for the application.
The premium license is an annual subscription, which provides additional features:
- You can use OneDrive to store your data, and to share it among multiple devices. NOTE: Using OneDrive can impact performance since the application must wait for the data to be uploaded to OneDrive every time you change something.
- You can schedule automatic backups that will back up your data up to you OneDrive account.
- Support for multiple years and semesters..
- Eliminates advertising
Settings
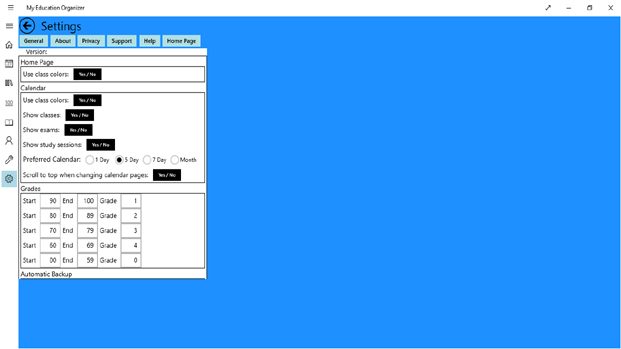
The Settings page allows you control certain aspects of how the application functions.
Home Page:
- Use Class Colors - allows you to specify if the application should use the class color when it displays a class name in upcoming events.
Calendar:
- Show Classes - allows you to specify if the application should use show scheduled classes in the calendar.
- Show Exams - allows you to specify if the application should use show scheduled exams in the calendar.
- Show Study Sessions - allows you to specify if the application should use show scheduled study sessions in the calendar.
- Preferred Calendar - allows you to choose your preferred calendar format.
- Scroll to top when changing pages - allows you to specify if the calendar should automatically scroll to the top of the page when changing calendar dates.
Grades: Allows you to specify the grade ranges and associated grades for your exams
Automatic Backup: This is a premium feature; you will not see it if you do not have a premium subscription. You may need to scroll down to see this option. Allows you to schedule automatic backups.
Use OneDrive: This is a premium feature; you will not see it if you do not have a premium subscription. You may need to scroll down to see this option. Allows you to specify if the application should save your data to OneDrive.